Our imagination is truly limitless. To improve the garden, many different devices and crafts have long been invented from seemingly unusable items.
When the useful life of a particular thing comes to an end, we often simply throw it away, although you can show your creativity and make an original craft that will attract the attention of others and delight the eye for many years.
One such item is a plastic bottle. Now let's talk about how to use it to make flowers.
In recent years, they have gained great popularity, since their production does not require a lot of effort and time.
Plus, plastic containers- a very affordable material that can be found in every home. Let's take a closer look at the various options for making flowers from plastic bottles for the garden.
Option #1

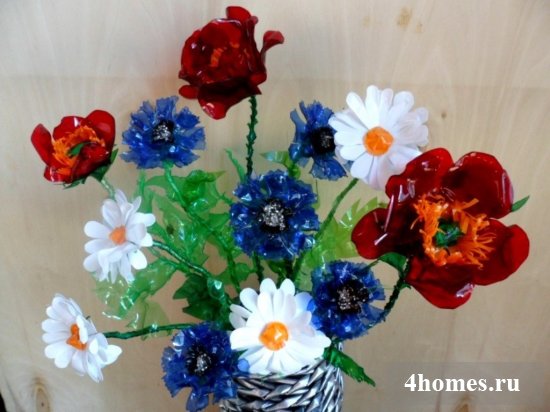
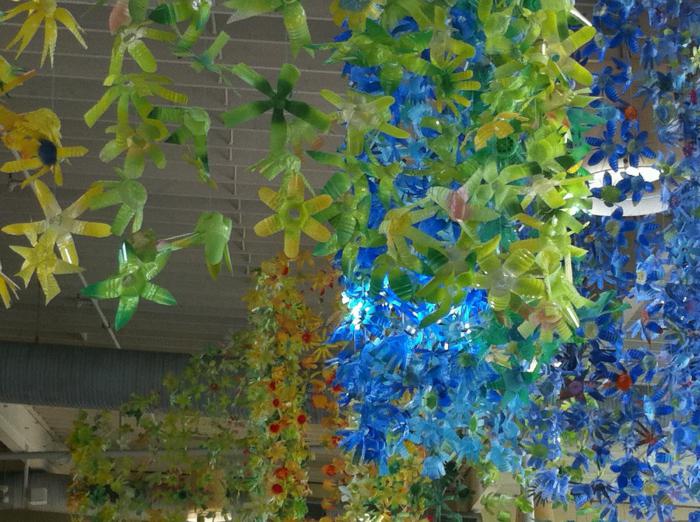
To make flowers like you see in the photo above, you will need plastic bottles of different sizes, aerosol paints, scissors, and a little imagination and diligence. You can cut out lilies, sunflowers, bindweed, daisies, hydrangeas, cornflowers, lilies of the valley or any other flowers you like.

To make these, you must first prepare the source material. The bottles must be thoroughly washed and the labels removed from them.

Then, when they are completely dry, you can start painting them. First you make different colored stripes on the bottle, depending on what kind of flower you want to end up with.

The last color will be the background color, so the bottle needs to be covered with special care. Painting of the material should be done outdoors, as aerosol paint is toxic.

When the paint is dry, cut the bottles into two parts. In this case, you choose the sizes based on the final idea of the flower. We get two separate blanks from which we cut out flowers.
A composition of these flowers will look very original together with living green plants.
Option No. 2

To make these beautiful flowers from plastic bottles with your own hands, you need to take several sheets of paper, scissors, a candle, a piece of unnecessary wire and, in fact, plastic bottles.
Carefully cut out paper stencils for corollas with small flower petals. Take the bottle and cut out squares from the middle part that will correspond in size to the previously cut stencils.
Then, using these same stencils, cut out the blanks for the whisks from the prepared plastic. Each corolla must be pierced with an awl or gypsy needle clearly in the center. Carefully process all the blanks over a candle flame to give the desired shape to the petals.

Afterwards, cut out the stencil and use it to create a sepal blank from a green bottle, and also process it over the flame. Cut the middle part of the green plastic bottle in a circle so that you get a strip approximately 1 cm wide.
Take a rigid wire with a plastic sheath. Then carefully wrap a strip of plastic around it, softening it over a burning candle.
Free the edge of the wire from the plastic sheath and place the sepals and corollas on it in descending order, pressing them tightly together. To secure the beaters, bend the end of the wire. The flower is ready!
The new fashionable trend of decorating the interior and exterior of residential premises with plastic flowers will delight those who like bright and unusual accessories. People who cannot have indoor flowers and plants in their home or who do not know how to care for them will also like this idea. And, of course, this method of using used plastic drinking containers will appeal to everyone who cares about the health of the planet, since it reduces the amount of non-degradable household waste, frees useful space from its accumulation and at the same time performs a decorative function. How to make flowers from plastic bottles with your own hands step by step for beginners and what are they like?
What can be decorated
Such unusual jewelry is interesting not only for its durability, but also for its unique variety, since each one is made entirely by hand. They decorate living rooms, kitchens, hallways and offices, apartment areas and entrances, and office premises.
They decorate work tables and kitchen tables, as well as any suitable horizontal surfaces. They create the appearance of freshness and naturalness, but you don’t have to water them, change the water, wash the vase, just wipe them from dust from time to time. And then, there will be a need for this.

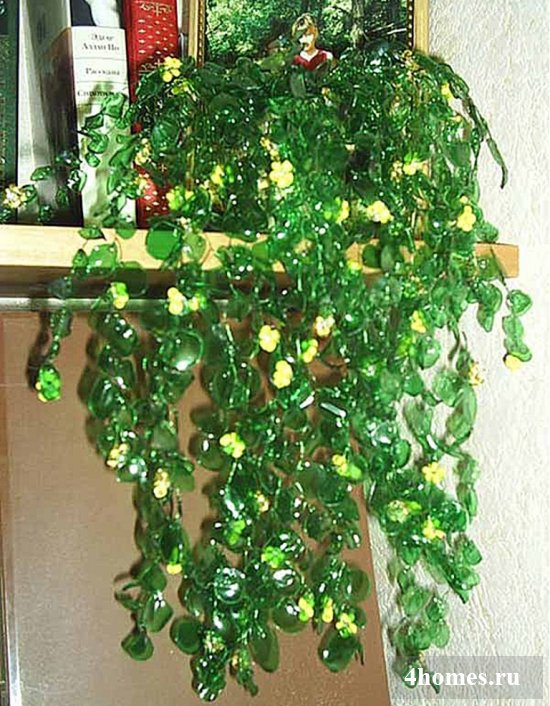
From such an accessible and pliable material as plastic bottles, crafts on the theme of indoor vegetation are made, not necessarily containing flowers, but also decorations like house plants. Suitable for those who love greenery in the interior, but cannot have natural living plants. Good reasons may include having pets in the home, allergies, lack of time to provide proper care, or inability to do so.

Not only real flowers, but also skillful plastic flowers can decorate your garden with rainbow colors. Especially if you have neither the time nor the ability to plant, weed and water flower beds with living plants.

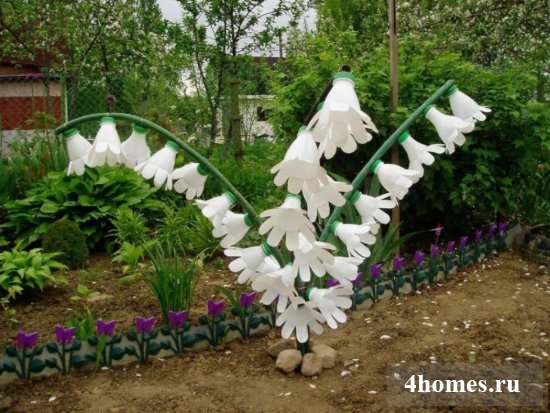
You can also create larger-scale decorations - flower trees and other tall flowering plants. For example, if construction is underway on a plot of land, especially if it has been somewhat delayed, you can organically embellish the look by building succulent bushes.

How to create
Such flowers have become very popular and widespread not only because they help decorate the interior and exterior spaces of buildings, but also eliminate the accumulation of empty plastic containers. The point is that their creation is simple and accessible, and for creative and observant people this is a huge niche where they can fully express their imagination.
The bottles are cut to the required size and given their final shape using smelting methods. Heat sources can be the flame of a candle, lighter, or hair dryer. Plastic as a material is very malleable, so it is quite easy to give it realistic shapes - under the influence of heat and tongs it easily twists and bends. To ensure maximum resemblance to real plants, the resulting blanks are painted with special paints or markers. And then the individual parts are fastened together using glue or rods (usually metal).

- Before you start creating something from a plastic bottle, you should thoroughly rinse it inside and out, remove labels, wash off the glue, and then wipe it dry with a cloth or towel.
- If you need to cut out many identical elements, it is better to make a sample out of cardboard, so that you can then simply trace it around the edges with an awl or needle.
- In order to give the desired shape to the workpieces, it is more convenient to use tongs and a candle flame. Such plastic quickly softens and cools, which makes it possible to perform various manipulations when forming a part.
- You can paint the part in the main color before curly cutting and melting; and then you can add dotted strokes.
How to paint plastic
- The best option is colored acrylic varnish.
- Acrylic paints also look good on PET products, but they should be coated with a clear acrylic varnish for durability.
- Large flowers for the garden can be painted with spray paint (for example, car paint).
- Enamel or stained glass paints are also used.
Tender rose
You will need: 2 PET bottles - green and any other color, thick wire, candle, tongs, awl, scissors.

- Depending on the desired size of the future flower, cut out 7 squares of sizes proportional to the blanks in the picture from a bottle of an arbitrary color (for example, blue).
- Using scissors, cut out four-petal flowers from each square.
- Use an awl to make holes in the center of the flowers.
- Hold each of them over a candle flame - the plastic will begin to bend, and in the process you can give it the desired shape using metal tongs.
- From a green container, cut out a receptacle, also four-leaved (“toothed”).
- Bend it slightly over the flame and make a hole in the middle with an awl.
- Cut part of the bottle (depending on the selected size of the accessory to be made) in a circle, you will get a spiral strip about 5 mm wide.
- Heat it over a candle and with your hands overlap the melted plastic onto the wire; leave approximately 1 cm “unrefined”.
- Place a receptacle and flower-shaped elements on the wire, starting from larger to smaller sizes.
- Use your fingers or pliers to bend the remaining part of the wire to secure the structure.
- Cut a blank for the stem from green plastic.
- Over the flame, twist the stems in a spiral and bend the leaves slightly.
- Connect the resulting sheet to the main stem, melting the place where the part is attached.
Field chamomile
You will need: 3 plastic bottles, ideally white, yellow and green (so that you don’t have to additionally paint), scissors, a thick needle or awl, a candle, tongs, superglue gel.

- Cut out 2 circles of the same diameter from a white container.
- Make 4 cuts to create equal parts.
- Make 3 cuts in each of them.
- Round the resulting petals, carefully cutting off the corners.
- Hold it on the candle for a while so that the edges of the petals bend slightly.
- Cut out two cores from the yellow container.
- Also bend slightly under the flame.
- From a green bottle, cut out a receptacle in the form of a 6-pointed star.
- Bend its ends over the candle.
- Cut a long green strip 4-5 mm wide in a spiral and, while heating, twist it around the wire so that there are no free areas left. Leave approximately 1-1.5 cm to place the receptacle on. To do this, you can heat the bare end of the wire over a fire or use a needle/awl to make a hole in the center.
- Place two white blanks on top.
- Place the first core and bend the remaining wire.
- Glue the second core on top.
- Cut leaves from green plastic.
- Curve over the flame.
- Stems, heat, twist into a spiral.
- Glue or solder the resulting leaf to the stem of the flower.
Finally
If you have a certain amount of PET bottles for drinking, dishwashing detergent, shampoo or other things at home, you should not rush to get rid of it as quickly as possible. Moreover, considering the fact that not all residential areas are yet equipped with specialized containers for storing plastic containers. Creating flowers from plastic bottles will not take much time even for beginners, and examples that describe step by step how to make them with your own hands will help you quickly learn how to make beautiful decorations yourself.
Recently, lawns and adjacent areas in the city have been decorated with plastic crafts. When the snow just melts and buds appear on the trees, flowers from plastic bottles are already adorning the lawns. We will consider a master class on field, indoor and garden plants from this material in the article.
Basic rules when working with plastic bottles
It is better for adults or older children to work with plastic under the supervision of a mentor. The fact is that in this creativity you have to work with sharp tools (scissors, awl, knife, cutter), aerosol paints, fire, which can lead to injuries if you are not careful.
The technique for making flowers is simple: draw a template and transfer it to a plastic base. Next, cut out the leaves, petals or finished flower. Poke a hole in the middle of the flower blanks with an awl or soldering iron and give them the shape of petals using fire. First, scorch the edges, then create a bend on the underside of the petal under the flame in much the same way as when creating flowers from satin ribbons. Use tweezers when performing this procedure.
You can make flowers from a plastic bottle from the top. In this case, a hole is pierced in the lid itself, which fixes the position of the stamens and pistils. The leaves are attached using fire or green tape. The stem can also be wrapped in melted plastic or electrical tape. To make the plants look like real ones, it is advisable to paint them with rain-resistant alkyd spray or acrylic paints.
Decorations for wicker fences and trees
Various fences for flower beds are woven from branches. Various flowers are attached to the interweaving of branches for beauty. Trees are also decorated with flowers and other plastic crafts using rope or wire, without deforming the trunks.
Let's look at how to make small five-petal flowers from plastic bottles. The master class is very simple.
- Draw a five-petal flower on paper.
- Use a marker to transfer this template onto the bottle.
- Cut out the blanks.
- Use your hands to bend the petals to the sides.
- Flame all the edges of the flower to make the cuts smooth.
- Then run the flame under the petals to give them a bend or angle.
- Try the blanks on each other.
- Determine the middle of the flowers and pierce with an awl in two places.
- Connect the blanks using a wire, onto which thread two or three beads.
- Twist the wire from the wrong side and cut off the excess ends.
- Now the flowers can be attached to the fence. If you don’t want to make holes, then the first blanks can be made from the top of the bottles, where the fastening goes through the lid.
Roses for outdoors and indoors
To make roses you need to draw templates of different sizes. The more elements, the more magnificent the flowers from a plastic bottle (the photo of roses confirms that multi-layering is created due to petals of different sizes).

Draw seven patterns of rectangles and squares on paper (these will be the elements for one rose). Within their borders, display a flower of four petals, the edges of which have a concave cut. Now transfer the rectangular and square blanks to the bottle. Cut them out using flower patterns.
Using an awl, make a hole in the middle of the rose. Now scorch all the flowers over the candle, lifting the petals up. Remember that melted plastic can cause severe burns, so use tweezers.
Forming roses
Wrap a thick wire with a plastic strip, which you melt over a flame. Leave one edge of the wire for the flowers and sepals (you will put them on in descending order). The middle of the rose can be decorated with a bead and secured with wire. Or cut a small circle from a bottle, cut it into strips, scorch it over a fire to form stamens, and attach it to the middle of the flower.
Next, cut out a template of leaves on a 3-petiole stem from the green bottle. Burn the workpiece over a candle. Twist the petioles of the leaves under the flame and attach the leaf to the base of the rose stem by wrapping the melted plastic edge around it. Using this pattern, make yourself a whole bouquet.
Flowers made from plastic bottles will be more realistic if they are tinted with paints. For example, veins or dark parts can be drawn in leaves; in the petals, enhance the color or add an additional shade. To simplify the work, you can wrap the stems with green electrical tape to match the color of the leaves.
Outlandish flowers from plastic bottles
The master class is a very interesting way to convey experience, as it shows how to make real flowers out of plastic.
- Cut off the top and cap from seven transparent plastic bottles.
- Cut 6 strips, form petals and singe them over the flame. In this case, first bend each petal. Then scorch along the edges and again go through the middle of the petal.

- Paint the blanks with red spray paints.
- Once the surface of the petals is dry, apply yellow paint to the middle of the flowers.
- In the lid of each flower, use an awl and scissors to make a hole of such a diameter that the pistil and stamens, which will be made of beads, can fit through.
- Paint it green (this will be the sepal).
- For the pistil, string a large bead onto a wire, which will be its stigma, and twist the ends of the wire. Only then dial 22 pcs. green beads.
- Make the stamens in the same way from glass beads and 19 pcs. blue beads
For one flower you need to collect the pistil and 6 stamens into a bouquet, wrap them with thread and insert them into the lid with glue.
Collecting flowers in a bouquet
Our flowers look like clivias, so look at their location on the stem in any photo. You need to make seven flowers from plastic bottles for one plant. While the stamens are drying, make 8 large leaves, four medium and four small oval leaves from a green bottle.

Treat each petal over the flame and straighten it a little. Make a hole at the base of the leaf and attach the wire. Now for the stem, take a meter thick wire or cable and begin to place the flowers in the desired position: one flower on top, then, after 20 centimeters, 3 flowers, and after the same distance - 3 flowers, which look in different directions, since their stems bent 90 degrees.
Then, after 10 centimeters, leaves are attached in 2-3 pieces, starting and ending with the smallest ones. That is, the arrangement will be as follows: two small, four rows of large leaves, two rows of medium and two small leaves. The stems are secured with green electrical tape. Such flowers can be installed in a flower bed.
Palm trees - interesting crafts from plastic bottles
Flowers are often made from transparent bottles, but what should you do with brown containers? Let's make a palm tree out of them! We will need brown and green bottles. For the palm tree trunk, dig a cable into the ground, which must withstand strong winds. Brown bottles will need to be cut with 8 pointed teeth on one edge. If you leave the bottom, then make a hole in it, but if you use the top of the bottle, then unscrew the cap.
You put tooth-shaped brown blanks on the cable, and spread the leaves to the sides with your hands or using a flame, creating the effect of tree bark. Once the palm tree has reached the desired length, attach the leaves that you make from green containers.
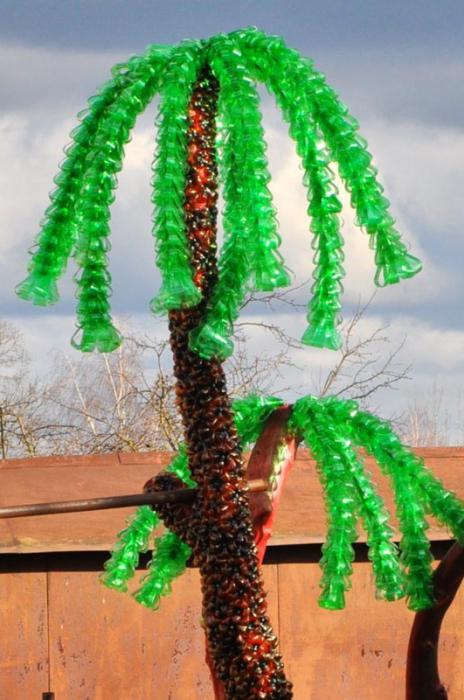
For foliage, the bottom of the bottles is cut off and long strips are cut to the top. Lids are not needed in this case. Next, leaves of the required length are put on the cable and attached to the trunk of the palm tree. The more branches you make, the more magnificent the tree will be, but then take a thick cable.
Yellow elegant flowers
Let's look at how to make elegant flowers from plastic bottles. The master class is as follows.
- Cut off the top and bottom of transparent bottles.
- Next, draw ordinary petals on them, similar to a rose: narrow at the base and with wide edges.
- You scorch each petal over a candle.

- From a transparent or green bottle, cut out individual leaves without petioles and sepals with 10 teeth, which you also melt over the flame.
- Paint the blanks with acrylic paints: the petals are yellow, the edges are red, the leaves and sepals are green.
- Make two holes in the leaves so that you can attach them to the stem.
- Now cut in half.
- Paint it green and the bottom.
- Make a cut in the middle to insert a petal, which you twist into a bud using fire.
- Insert the remaining petals with the tip, creating one or another tilt if necessary.
- Once the flower is collected, turn it over.
- Insert a kebab stick painted green into it.
- String a sepal and a leaf on it.
Create a whole bouquet using this pattern.
climbing flowers
Now let's look at the master class. Prepare plastic bottles (transparent flowers, green leaves) according to the standard scheme, cutting off the tops and bottoms. For leaves, cut the bottle in a spiral 10 centimeters wide. Draw leaves on a long branch on it, cut it out and melt it over a candle, twisting the petioles in some places.
Then you make templates of two colors with five petals: large and small. You also burn it with a candle and paint it with paints. Make holes in the middle of the flowers and connect the two templates with wire, taking several beads for the stamens.
The next step is to poke holes in the leaves in the right places on the vine and attach the prepared flowers, cutting off the excess ends and hiding the wire in the foliage. Next, combine all the curly branches into one bundle, fasten them and hang them on a nail or in a flower pot.
As you can see, you can make a wide variety of flowers for the garden and home from plastic bottles. And naturalness and naturalness can be given to them with the help of paints.
If you think that this is not for you, that you have both hands “left”, you could never even make a craft for your child in the kindergarten, then do not rush to conclusions. You can create beautiful flowers from plastic bottles with your own hands in a matter of minutes. It's very simple and you probably have all the materials you need at home. In addition, such crafts are an excellent budget option for decorating the garden, for the home; such flowers are also suitable as crafts for children in kindergarten. So let's get started! We will tell you simple master classes for beginners.
- Before you start working with plastic containers, you must wash them thoroughly and remove any paper or plastic labels.
- To make your crafts more lively and different, it is better to paint the bottles. For this, it is best to take acrylic paints, but they will have to be fixed on top with varnish. It’s better to immediately purchase acrylic varnish with a colored base. You can also use spray paint.
- To avoid cutting yourself on the uneven plastic edges of the bottle or getting burned from the fire, and without it you cannot make flowers from plastic bottles, it is especially important for beginners to always use gloves.
- To make it easier for you to make good flower shapes, always draw them on cardboard first as templates. And then make plastic cuttings using them. To make an outline, use a marker, an awl or a thick needle.
Materials for creating flowers from plastic bottles
Of course, in order for you to know exactly how to make flowers from plastic bottles, you must know what you will need. There is nothing complicated here.
So, you will need:
- of course, there are many and different bottles to create different options;
- paints and brush for application;
- candle;
- pliers;
- wire;
- beads, beads or buttons for decoration;
- hot glue gun for adhesion of parts or thick threads;
- cardboard and scissors;
- marker, awl.
So let's get started.
DIY flowers from plastic bottles step by step for beginners
Method 1. Making simple, spectacular flowers.
To make such a flower you will need literally 10 minutes. By the way, you can create a lot of them, and then make a large bouquet by attaching the stems. They can also be used individually, for example, to decorate the surface of a fence or wall. You can create a whole panel of multi-colored flowers.
- So, first draw a flower on the cardboard. One of which will be larger, the other smaller. It is better to take different shades of plastic, as shown in the picture.
- Transfer the templates to the bottles using a marker and outline them. You can make a large flower from the bottom of a cut bottle. Then you just have to make cuts on both sides above each indentation on the bottom.
- The blanks are ready, take them with pliers and heat them over a candle. But don't overdo it. Be careful and use gloves.
- When the plastic becomes warm, bend the cut edges of the bottom of the bottle as shown in the figure. It will be a big flower.
- You simply cut out the small one and heat it slightly to give it a concavity.
- Flowers can be connected to each other using hot glue or thread. Decorate the middle with a beautiful button, bead or beads.
Method 2. Making daisies

- You will need white plastic bottles. Dairy products often have these. But choose them without ribbed walls.
- The bottom of the bottle needs to be cut off.
- To make daisies, you just need to cut out neat petals. To make them even, first draw a template on the bottle with a marker. Or cut first into two even parts, then into four and then into six. Then round off the edges of the petals. But it's easier to draw first. You need to cut the petals up to the lid.
- To make the daisy look believable, look for bottles with an orange cap, or find one separately, or paint it.
- Connect two bottles together and secure them with wire or thread, after making holes in the lid using a hot awl.
- You can make a wire stem for the daisies and decorate it with green leaves from bottles. To do this, again draw the templates, cut them out and shape them over the fire.
Method 3. Making Roses

- Draw patterns of seven colors, different sizes as in the picture. These are all components of one flower.

- Cut them out of plastic. Take different shades of bottles for each flower.
- In the blanks, make a hole in the middle with an awl to fasten the petals together.
- Next, heat each plastic flower over a fire so that the edges are deformed.

- Combine all seven colors into one, add a beautiful button or bead to the center.
- To make the stem, take a green bottle and cut it into a spiral. Then heat it over the fire and wrap it around the wire.
- Add leaves to roses.
Method 4. Making zinnias and chrysanthemums

- Cut the bottle in half.
- Next, cut it up to the lid into thin strips. We make 2-3 more of these blanks. You can take bottles of a smaller diameter to make the flowers look more voluminous. The neck of these blanks can be cut off.
- We heat the workpieces over the fire, twist thin strips in the opposite direction with a knife or scissors. We do this with all bottles.
- We insert one flower into another and secure them with hot glue. The center can be made from the lid, so the flowers will look more like zinnias. If left without it, the flowers will look like chrysanthemums.

- We make a stem from wire.
Method 5. Making sunflowers.

- We take bottles, cut off the bottom, you need two bottles for one flower. We do not throw out the bottom and paint it brown if it is not brown.
- We paint the bottles equally yellow and green.
There are many things in everyday life that can become excellent materials for creativity. If you have a pile of unused plastic bottles, don’t rush to throw them away. With their help, you can create amazingly beautiful things that will become a wonderful element of home decor, decoration of a cottage or yard. DIY crafts made from plastic bottles will help you have a fun time; small children will especially enjoy this activity. See below for master classes with photos that will show you step by step the creation of such original things.
Step-by-step instructions for making crafts from plastic bottles
It's amazing how many products you can create using ordinary plastic bottles. Together with your child, you can make fairy-tale characters - Cheburashka, Crocodile Gena, Winnie the Pooh, Piglet, and the Frog Princess. The figurines of birds look original - storks, wood grouse, pigeons, swans. Crafts from domestic animals and wild animals, such as a cat, a dog, a parrot, a penguin, a donkey, a squirrel, and a pig, look great.
You can place these things in the kitchen or in the nursery, or decorate the yard outside. Not only decorative, but also functional crafts can be used to decorate your home. For example, a beautiful plastic vase will be useful for storing bouquets - dry or live, and you can plant indoor plants in an original pot. For your summer cottage, you can make figurines of animals and plants, cars, rockets, and a lake made of bottles will surprise guests at home and become a true work of art. Read on to learn how to make crafts from plastic bottles with your own hands.
Original palm tree for a summer residence
Plastic bottles are an unusual and budget option that will help summer residents decorate their plots. The original exterior will definitely be appreciated by loved ones who come to visit and neighbors. A stylish tall palm tree looks beautiful, for which you will need ordinary brown and green containers. What materials are needed to make a southern tree:
- bottles (brown, green);
- a metal sheet;
- cable (take high voltage, 12-14 mm);
- scissors;
- rods (at least 25 cm), tubes (2 cm in diameter) and bushings (metal).
How to do:
- Remove labels from bottles. Take the green ones and start making leaves: to do this, use scissors to divide them in half. Cut thin strips along the surface (to the point where the container narrows). String the finished leaves onto the cable. For one tree you will need seven such elements.
- For the trunk, take brown bottles and cut them lengthwise into six pieces to create wide stripes. Also string it onto the cable.
- How to make a base: weld rods to a sheet of metal at different angles. Place tubes on them. Attach bushings to the end of the rod so that you can thread the green containers through them.
- Assemble the trunk on the rod: to do this, place the brown blanks on top of each other, lowering the neck down. Pull the cable through the grommets, securing the leaves on top.
- After assembly, bury the structure in the ground, but no more than half a meter.
How to make an original palm tree, watch the video:
Beautiful baby elephant made from plastic bottles for kindergarten
A child who goes to kindergarten enjoys his surroundings: beautiful places to play, new toys. Crafts made with plastic bottles can be a wonderful decoration for the interior of a kindergarten or street. If you want to surprise the kids, make a beautiful baby elephant. What materials will you need to create an interesting decoration:
- two bottles (six liter);
- two-liter containers (six pieces);
- half-meter corrugated pipe (small diameter);
- acrylic paints in gray (or blue), white, black, red shades;
- thick wire fifty-five cm;
- sand;
- glue for plastic;
- scissors.

How to do:
- Cut two-liter bottles in half, the bottom parts will be the elephant's legs.
- Make ears from six-liter material. In the second large container, cut holes to secure them.
- Bend the wire - this will be the shape of a trunk. Place a pipe on it.
- Paint all elements gray or blue. Connect, gluing the legs to the body (after pouring a little sand there), and the hose to the hole of the large bottle that serves as the elephant’s body. Insert your ears into the holes.
- Paint the eyes with black and white paint and the mouth with red acrylic.
How to make a swan to decorate a playground
A beautiful swan will be a wonderful decoration for a children's playground or your own summer cottage. This bird, which is made using plastic bottles, looks beautiful and original. Children will definitely love this figurine, which serves as a decorative element. What materials will you need to create a beautiful white swan:
- one bottle per five liters;
- rigid wire hose;
- milk bottles;
- marker;
- candle;
- wire;
- scissors;
- dye.

How to do:
- Mark cut lines on the large bottle. Carefully remove the top, but leave the neck - this is the body of the bird.
- Insert a hose with a wire through the throat - this is the swan's neck.
- Cut off the bottoms and necks of the milk plastic elements. Cut out feathers from them. Decorate their edges with fringe. Light it a little with a candle. Collect two feathers with wire. Glue to the body.
- Cut off the bottom of small bottles, put it on the hose, forming a neck. The swan's head will come from the top of the white container. Make holes in it and the hose on both sides, fasten with wire material. Close the lid.
- Take a chemical cap. Cut in half. Insert the cap into the lid. Glue it to your head.
- Color the beak, draw the eyes.
Master class on making a Christmas tree for the New Year
A New Year tree is a tree that is traditionally purchased before a major holiday. But if there are a lot of green plastic bottles left at home, there is nothing difficult in making a budget and original option yourself. In addition, this tree’s needles do not fall off and it can stand for a long time. What materials will be needed to make wood:
- six bottles (two-liter);
- scissors;
- wooden base (half a meter);
- paint, brush;
- plasticine;
- pot.

How to make:
- Cut off the bottom of the bottles. Cut the top lengthwise into eight strips, using scissors to form their sharp corners. Do this carefully.
- Using scissors, run along the petal until it curls.
- Secure the base in a pot on plasticine. Place bottle blanks on it. Use scissors to trim off any excess plastic from the top petals to give the tree its shape.
- Paint the tree green.
Cat pot made from a plastic bottle for indoor plants

A beautiful cat vase will be an excellent decoration for your room interior. You can use this element to store various small items or plant beautiful plants there. Cacti, ivy, and succulents look good in such a pot. Small children will love making this original cat. What tools are needed to create an interesting decoration:
- one and a half or half liter bottle;
- acrylic white paint;
- markers;
- scissors.

How to make:
- Cut off the bottom third of the container. Form ears, removing excess.
- Paint the outside and inside with acrylic paint.
- Draw the cat's eyes, ears, and mouth using the template.
- Plant your favorite plant in a pot. If you want, make the planter hanging by cutting symmetrical holes on four sides.
How to make a peacock with your own hands
The beautiful peacock is a bird that symbolizes happiness, fulfillment of desires and nobility. Such a figurine, placed on a summer cottage, will bring good luck to its owner. A peacock requires painstaking and serious work, so it will take a lot of free time to make it. What materials are used when creating a wonderful bird:
- many plastic bottles of different colors and sizes;
- stand;
- synthetic foam;
- glue gun;
- abrasive mesh;
- colored paper;
- scissors.

How to create a craft:
- Remove the necks and bottoms from the bottles. From the main part of the containers, cut out many feathers of different sizes - from small to huge. Trim the edges with fringe.
- Sort the pieces by size.
- Make a bird figurine using polystyrene foam. Attach to stand.
- Cut out the beak (use the red bottle).
- Decorate the bird's chest with small multi-colored plastic parts. Gradually cover the foam as you get closer to the tail, using larger feathers.
- Alternate colors to make the peacock look bright.
- For the tuft, make several plastic strips with a fringe at the end.
- To decorate the bird's head, take small oval, round pieces of plastic. Make eyes from a brown bottle.
- Cut the abrasive mesh into the shape of wings. Attach feathers to it - move from small to large.
- Make the tail also using a mesh.
- Complete the ends of the feathers with paper parts: cut out circles of different colors and sizes. First glue a large oval, a smaller one on it, and place a very small element inside.
- Connect all the parts with glue.
Watch the video for more details:
Children will absolutely love creating a beautiful craft - a butterfly. An easy master class will help even the little ones create an original figurine. The craft can serve as an element of interior design or as part of a painting. You can make many butterflies of different shapes to decorate your children's room. What materials will you need for this master class:
- paints;
- marker;
- plastic bottle;
- scissors.

How to make a craft:
- Cut a cylinder from the flat part of the bottle. Cut in half.
- Draw a butterfly on the resulting convex plate.
- Cut it out.
- Fold the wings so that they take on a natural shape.
- Color as desired.
For more details on how to create a craft, watch the video:
Decorative flowers
Decorative flowers will be a wonderful decoration for your home. You can create sunflowers, daisies, roses, and other plants. An easy master class with photographs will help you easily make an original decoration. Decorate boxes, baskets, shelves with it or make an unusual picture. What elements will be needed to make an original craft:
- bottle;
- lighter;
- scissors;
- marker.

How to create a craft:
- Draw flowers on the surface of the plastic container with a marker. Cut it out.
- Bend the petals so that they look in one direction. Burn them to get a beautiful shape.
- Make several. Connect them by placing them on top of each other using glue, wire, or heat. Decorate the center with beads or a plastic flower.
Bright flower beds for the garden and vegetable garden
A flower bed using plastic containers is easy to create. This material will help you create a budget-friendly and beautiful design for garden plants, separating them from the lawn. The craft will not take much time, and the result will delight you with its originality and beauty. What materials will you need to make a simple flowerbed for garden plants:
- a lot of plastic containers (plain or colored);
- paint (if desired);
- sand/earth.

How to do:
- Clean the bottles.
- Fill them with sand or soil (full or half).
- Create a flowerbed fence by firmly digging containers into the ground with the neck down. It is important that they fit snugly against each other.
- If desired, paint the finished fence.
See the video for options for such flower beds:
Video tutorials on making crafts from plastic bottles for beginners
It can be difficult for beginning needlewomen to create an original craft using only pictures. To do this, experienced craftsmen make interesting videos for free, where they describe step by step the stages of creating a particular figurine. Visual examples will help you repeat all the actions of the presenter and make beautiful things using plastic bottles. In the following master classes you will learn how to make a hedgehog, a rag doll, daisy flowers, an autumn bird feeder, a crocodile, mushrooms, and how to decorate a dacha with corks. Watch interesting videos with a detailed description of all actions:
How to decorate your dacha with plastic bottle caps
Photo ideas for DIY crafts from plastic bottles
When creating crafts, it is important to get ideas that will help you make truly interesting and beautiful things. Many people make unusual products with plastic bottles, and then take pictures of them with a camera. A variety of decorations for your home, yard or cottage, made by craftsmen, will help you choose your own option or come up with something new. See many photos of crafts made from plastic bottles.
Similar articles


